How to Make a Slideshow in Windows 10
A slideshow is one of the best ways to organize pictures for storage. Indeed, most Windows users face hardware problems or OS updates when they need to transfer files so they don't get lost. In addition, knowing how to make a slideshow on Windows 10 is an effective way to display photos, videos, and other visuals more engagingly. It is a great way to bring presentations to life with a creative touch. With the right tools and techniques, you can easily create beautiful and professional-looking slideshows in no time. Read further to learn how to make a slideshow on PC in three free ways.
1. How to make a slideshow in Windows 10 with software?
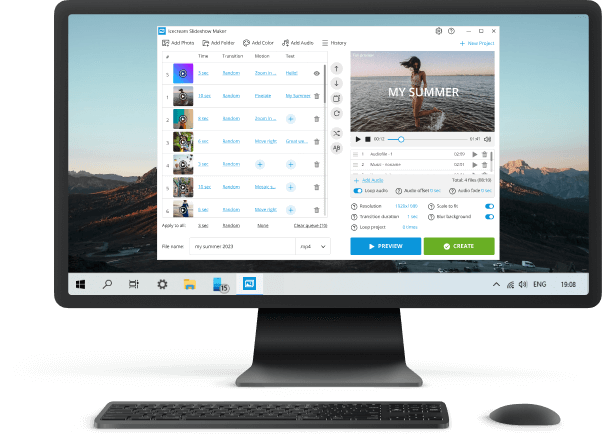
- Download the slideshow maker for Windows and go through the setup. Launch the program to proceed with the photo slideshow creation.
- Click the "Add Photo" button to add pictures to the program one by one, or press "Add Folder" to load all images. With the drag-and-drop mechanism you can simplify the image addition process.
- Add sounds to construct a playlist for the slideshow either by using the "Add Audio" button or by simply dragging and dropping them. The files added can be reordered. You can loop the background audio ("Loop audio"), set offset ("Audio offset"), and fade ("Audio fade").
- Click "Preview" to check if the images and audio are set as intended.
- Hit "Create" to make a slideshow on Windows 10 or Windows 11. The progress bar will give you information on the status – the time remaining and the time elapsed.
When the slideshow creation is finished, the slideshow making software will open a pop-up notification offering you the options to open the output folder; upload the video to YouTube, Google Drive, or Dropbox; or burn the file to CD or DVD.
Advantages
- The order of images can be changed: drag them or highlight an image and use the UP/DOWN arrow buttons. You can apply the "Shuffle photos" button to randomize the order. Sorting files by their names is also available.
- This software has a mechanism to set the duration time in seconds for each slide or for all the pictures at once.
- The file name and the output video format can both be changed.
- Audio for background music can be in MP3, M4A or WAV format.
- Supports Windows XP, 7, 8.1, 10/11.
- A wide range of customization tools: adjust font, color, position, and add animations.
- Slideshow creator is free of charge and has no watermark.
As detailed above, Icecream Slideshow Maker is a modern, easy-to-use program compatible with the latest versions of Windows OS, providing quick slideshow preparation along with advanced features.
2. How to Make a Slideshow on PC in Microsoft Photos?
Creating a slideshow using the in-build tool is easy and fun. Here's how:
- Open the Photos app. You can find it in the Start Menu or by searching for "Photos" in Cortana.
- Click on the "Create" button in the top-right corner of the screen.
- From the dropdown select "New Video Project".
- Enter the name of the slideshow.
- Add photos to the library by pressing "Add".
- Drag and drop uploaded files to the storyboard.
- Choose the needed settings and filters.
- When all changes are done click "Finish Video".
Utilizing the Photo Viewer to create slideshows can be a neat tool to bring your photos to life. This default Windows slideshow maker has the potential to turn a collection of ordinary photos into something extraordinary. But it is important to consider the benefits and drawbacks of this approach before diving in.
Pros:
- You can set the duration, add music, and text, and utilize 3D effects.
- The result can be saved as a video file, so you can easily share it.
- Perfect for quick slideshow creation.
Cons:
- Comes in-build only with Windows 10.
- Not suitable for complex edits or advanced techniques.
- Can't save images in custom formats or sizes.
- Doesn't offer support for third-party plugins.
Ultimately, making a slideshow on Windows 10 Photo Viewer can be both enjoyable and fulfilling. It's easy to learn and offers some customization options. However, it doesn't have as many features or support for high-resolution images as other slideshow makers. Ultimately, the choice of whether or not to use this program will depend on your individual needs and preferences.
3. How to Make a Slideshow in File Explorer?
Creating a slideshow from your photos in Windows is a breeze and enjoyable. Here's how:
- Launch File Explorer and go to the folder containing the photos you want in your slideshow.
- Select the images you wish to include by clicking them while holding down the Ctrl key.
- Click on picture tools under Manage and choose "Slide Show" from the context menu that appears.
- A new window will appear with your photo slideshow. Right-click on the slides to put them on pause, go to the next photo, back to the previous one, and play it randomly. You can change the speed of the sequence and put it on repeat.
- To finish the slideshow click "Exit".
Using such a slideshow maker as File Explorer may be a fantastic idea for sharing your memories with friends and family. But what are the pros and cons? Let's explore.
Pros:
- It's easy. You don't need any special tools or knowledge of coding.
- You get to choose what pictures you want to add to slideshow, as well as the order in which they appear.
- You do not have to pay for any additional software or services.
Cons:
- Limited customization features.
- No support for 3rd party plugins or effects.
- No timeline feature for creating complex animations.
- No ability to add captions or titles to slides.
- Cannot export projects as video files.
Creating a slideshow using images in File Explorer is an excellent method for show off your pictures without the need for an extra program. However, there are some drawbacks, such as the lack of editing capacities and difficulty in sharing with others.
Reasons to make a slideshow?
Making a slideshow can be an effective way to effectively tell your story. Here are some of the advantages:
- It's visually compelling. Slideshows can be used to capture an audience's attention and keep them engaged.
- It's convenient. You don't have to lug around physical photos or documents - a slideshow is always with you on your laptop or tablet.
- It's easy to update. If you need to make revisions, you can easily do so without having to reprint new images.
- It's cost-effective. You are not obligated to think about printing costs or buy extra equipment like projectors.
- It allows you to be creative. You can add visuals, music, and videos to enhance the presentation and make it stand out.
- It's organized. Your slideshow video will be properly sequenced and easy to follow for your viewers.
- It can be memorable. An effective presentation will stay in memory long after the performance has ended.
With all of these advantages, it's no wonder that many people are choosing to create slideshows! So now that you know why it's a good idea, let's look at how to create one in Windows!
Tips
- Plan ahead. In advance of making a slideshow on Windows 10, decide on the type of presentation you desire to create. Confirm you have all the necessary visuals and information.
- Gather your materials. Gather all the items to be included in the slideshow such as images, videos, text, etc.
- Start building. Create a new project in your chosen slideshow maker and begin adding your stuff to it - images, text, graphics, etc.
- Organize your slides. Arrange the slides in chronological order and use transitions between each one to make them look professional and attractive.
- Insert audio/video. If you want to add audio or video clips, take appropriate video formats and ensure they are optimized for web playback.
- Search for mistakes. Prior to submitting the slideshow, double-check photo slides for any typos or other errors that could distract you.
- Keep it brief. Remember that less is more - try to stay your demonstration concise by focusing on key points and avoiding unnecessary details.
- Choose an appropriate background. Select a background that will complement the content. Plain backgrounds work best as they remain in focus.
- Practice. Make sure you practice presenting previous to actually delivering the slideshow in front of an audience. This will help ensure that everything goes smoothly during the presentation!
How to Make a Slideshow in Windows 10: To Sum Up
Generating a slideshow on Windows can be an excellent method to share your photos and make them stand out. After reading this article, you should now have the knowledge to create your own slideshow.
To consider when making a slideshow are the order of the photos and their duration. Photos should be in an order that makes sense, and the duration should be set so that viewers have enough time to appreciate each one. Transitions must be used sparingly so as not to divert from the images.
In conclusion, creating a slideshow in Windows is not difficult and with this guide, you can now easily make your own stunning slideshows!
More Software You May Find Useful
- Free photo resizing app makes altering multiple photos simultaneously on a Windows PC a breeze.
- Merge media, trim and crop video, add custom tracks, apply titles and transitions, and explore other features of Video Editor.
- Capture webinars, Zoom meetings and Skype calls, video guides, live streams, and so on utilizing Screen Recorder.