How to Screen Record on Windows
Using screen recorder on a Windows PC is an excellent way to capture memories of special occasions, lectures, and website content. It has numerous practical uses and is a remarkably useful skill. Many users have probably at least once needed to create a video tutorial for their colleagues, record a gameplay clip or save a webinar to re-watch it later on time. But how to screen record on Windows OS?
1. Icecream Screen Recorder - screen recording software for Windows 11, 10, 8, 7
Let's start with Icecream Screen Recorder - a free software to record screen video. The software has clear controls and a user-friendly interface that even a novice with minimal experience can understand. At the same time, the program provides all the necessary options for quality video recording (drawing, hotkeys, and more). To get started and screen record on a Windows computer, follow these instructions.

- Download and install Screen Recorder and run the app on your Windows computer or laptop.
- Select the recording area. In the main program window, you will see a menu on the left. It contains the main functions: Capture video, Screenshots, Capture audio, Game capture, and Tasks. To record screen right away, you will need the first option which is "Capture video". Click it and select the area you want to capture. It can be the whole screen (Display) or a part of it (Custom area). Opt for the "Around mouse" mode if you want the screen recording area to move along with your cursor.
- Start video recording. After selecting the area, a recording panel will appear on the screen. Here you can resize the recording area, set a timer, turn on and off the webcam, microphone, and speakers, and open the drawing panel. Click the "Record" button or the F7 hotkey to screen capture on Windows PC. You can pause the process of video capture, too. Press F8 hotkey or "Stop" on the video recording panel to save the file.
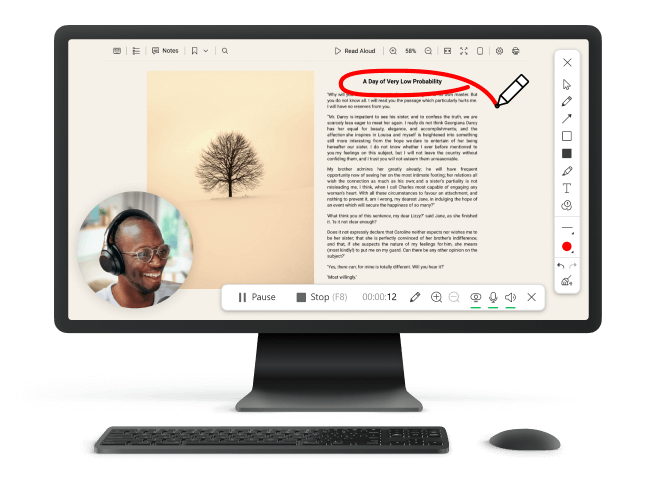
Draw While You Record Video
During desktop recording, you can use a drawing panel. Utilize it to add graphic elements and text to annotate your videos. Here's what the panel offers.

- Arrow. With its help, you can indicate interesting moments and important objects.
- Pencil. Add freehand drawing within the screen record area.
- Rectangle. Add a frame around notable parts of a video.
- Fill. Adds a filled square or rectangle.
- Highlighting. Helps the user to select a specific area to focus on while watching the clip. It can be a part of a document or a drawing.
- Text. Allows you to make notes during the screen capture.
- Steps. Quite an interesting option that allows you to add numbered bullets. This is quite handy for creating presentations, video tutorials, lifehacks, and detailed work instructions for the staff.
For all this functionality, a choice of color and line thickness is available.
Advantages of Icecream Windows Screen Recorder:
- Does not take much space on the PC or laptop hard drive;
- Screen recording software with an intuitive interface with no learning curve;
- Free distribution;
- Offers the feature to add a custom watermark to videos;
- Extensive functionality;
- Desktop recording does not require a constant Internet connection;
- Flexible settings at all stages of work;
- Great help system;
- Built-in video editor with the option to trim videos;
- Works on Windows 11, 10, 8, 7.
2. How to Record screen on Windows 10 Using Xbox Game Bar?
Windows users have a simple method to record video on PC with a built-in tool called Xbox Game Bar. It allows you to capture either your entire screen or just a portion of it with ease. The recordings can be saved in various formats, including MP4 and GIF.
- Launch the screen recording app on your Windows 11 or 10. Also, you can press Windows Logo+G on the keyboard.
- Check the settings. You can turn on external audio and adjust system tones.
- Then click on "Start Record".
- A video of the screen will be recorded. Stop recording video by pressing Win+Alt+R.
- Your video is stored in a folder named "Captures" in File Explorer.
Pros:
- Since it's already part of Windows OS, there's no requirement for further programs search and installation;
- Customize different recording settings like resolution, frame rate, and audio;
- With a few clicks from your keyboard, you can easily start or stop recordings.
Cons:
- Only basic control over recording settings;
- Works well for occasional short recordings, but not optimal to record long desktop videos;
- You won't be able to edit your videos;
- Presents on Windows 10 and 11 only.
3. Capture Video from Screen With Snipping Tool
The Snipping Tool is one of Windows' most useful built-in apps. It permits you to take custom regions of your screen, and more. With the newest version, you can record your screen activity too.
- Open the Snipping Tool on Windows 10.
- Click "Record" > "New". Choose the screen recording area. Press "Start".
- When your recording is finished, tap "Stop". Your captured video will be kept as an MP4 file in your designated folder for videos.
Pros
- Windows screen recorder gives users the ability to choose a specific region of the screen to be recorded;
- Great for recording short tutorials or presentations;
- Intuitive – no need for additional software or hardware.
Cons
- Lets you screen record on Windows 10 only;
- Only basic trimming and cropping can be done;
- Can't record audio;
- Maximum video recording time is limited to five minutes.
4. How to Screen Record on Windows with OBS?
Using Windows with OBS Studio can be an excellent method for recording video for guides, gaming, or simple capture. Equipped with a powerful API, it lets you capture your footage and connect to any streaming or broadcast platform. Here's how to record screen with OBS studio:
- Download and run OBS. Once the installation is complete, launch the program.
- In the Sources box, press + to specify the settings. Press "Display Capture". Input the data and click "OK".
- Select your display and capture video function. Hit "OK".
- Select the recording path by clicking "Browse" in "Settings".
- Press the "Start Recording" button when all your sources are added.
- Tap "Stop Recording" to end the video capturing.
Pros:
- You can record desktop in full HD resolution and the recordings are good quality;
- You can insert overlays.
Cons:
- Whole desktop recording takes up a lot of computer resources;
- Can only record from one sound source at a time;
- No editing option while recording.
5. Windows Screen Recording with PowerPoint
Microsoft PowerPoint can be a great tool for creating and recording presentations. It has a built-in Windows screen recorder that allows you to quickly record what is happening on the display. This can be used to show someone a tutorial, or just to capture a memorable moment from your presentation.
- In PowerPoint, open a new presentation and add the desired slides.
- Go to the slide that you would like to add to your video.
- On the Insert tab, use the "Screen Recording" command. This will open a Control Doc.
- Hit "Select Area" or hold down Win+Shift+A.
- When finished selecting, click "Record" to begin record video on PC.
- Stop recording by pressing Win+Shift+Q.
- Application will store video automatically as part of the presentation. You can extract it with the right mouse button and choosing "Save Media As".
Pros:
- Comes with basic editing features like trimming and adding captions;
- Recording software works alongside Microsoft Word and Excel.
Cons:
- No support for recording audio from external devices, such as microphones or cameras;
- Cannot record from multiple screens simultaneously.
Reasons to Capture Video from Screen
Screen record on Windows can be a terrific method for documenting what you do on your screen. Whether it's for work, entertainment, or educational purposes, recording your screen can be beneficial in many ways. Here are a few arguments:
- Capture memories. Use Windows screen recording to keep memories of your favorite games, and shows. You can even build a highlight reel of the best gaming moments.
- Save workflows. Recording a tutorial or workflow can help you recall the steps quickly. Once saved, you can easily refer back to the video if you forget how to do something.
- Create how-to videos. If you're an expert in something and want to share your knowledge with others, creating such videos is a great way to do so. With a Windows screen recorder, you can record all the steps.
- Share presentations. If you're giving a presentation or lecture, recording it allows those who were unable to attend to watch it at their convenience.
- Record online meetings. By recording the meeting, participants can go back later and review the content for better understanding and retention.
Recording a screen on Windows is easy and convenient. With its many benefits, it's worth considering if you haven't already done so!
How to Record Screen on Windows 10: FAQ
1. What is the optimal video quality for desktop recording?
The best video resolution for recording video depends on your needs and preferences as well as the capabilities of your computer hardware and software. Generally speaking, a resolution of 1080p (1920x1080) or higher is recommended for recordings, but other factors such as frame rate and bitrate also play an important role in determining the final video quality.
2. Can I record a specific area on my computer?
Yes, select a window or application to screen capture instead of recording the entire desktop area. You can usually find this option in the program's settings or preferences menu.
3. What is the best rate of frames for Windows screen recording?
The ideal frame rate for recording videos depends on what kind of video you're trying to make and how much motion will be involved in it. For general video recordings, a frame rate of 30 fps (frames per second) should be sufficient. But if you're making a video with lots of fast-paced action then 60 fps might be better suited for capturing all the details without motion blur or stuttering effects.
4. How do I edit my recorded videos?
Our screen recorder has built-in support for modifying recorded videos from various sources, including computer screens and webcams.
Screen Record on Windows: Tips
- Choose the right recording software. Make sure you select a screen recording software for Windows that fits your system requirements and offers the features you need.
- Adjust the settings. Configure the settings before recording to ensure the best possible quality. Select resolution, frame rate, and bitrate.
- Check audio. Test your microphone or other audio sources before beginning to record screen video. Make sure it's plugged in properly and that you can hear it clearly on playback.
- Create shortcuts. Set up keyboard shortcuts for functions such as starting, pausing, and stopping recordings to save time while recording.
- Optimize performance. Close any unnecessary programs and windows to maximize available RAM and improve performance during recording sessions.
- Hide personal info. If there is any sensitive information like passwords or account numbers on your screen, hide them before you begin recording video.
- Use annotations. Utilize drawing tools or text annotations to highlight important aspects of your video while recording or during post-production editing.
- Organize files. Make folders for each project so that all related files are in one place.
- Edit videos: Take advantage of editing tools to trim unwanted sections or add titles, transitions, effects, music, etc., to enhance videos after they are recorded.
- Share online. Upload your videos to a variety of hosting platforms like YouTube or Vimeo for easy sharing online.
How to Screen Record on Windows: Conclusion
Windows screen recorder is an excellent choice for capturing live footage and sound on your computer. The goal can be met either with the free programs included in Windows 10 or with software from other sources, allowing you to also include annotations and effects during the recording process for a polished look. Our program is not only simple to use but can provide you with all the popular options you need for quality desktop recording. Capture any type of content with ease with the screen recording software for Windows!